Cheap DIY Garden Path Ideas That Look Like You Spent More
A cheap DIY garden path costs between $2 and $10 per square foot, depending on your material choice. Gravel, wood chips, stepping stones, recycled bricks, and concrete pavers are the most budget-friendly options. You can build most paths in a single weekend with basic tools. The key is picking the right material for your soil type, foot traffic level, and how much upkeep you’re willing to do long-term.
Most garden paths fail not because of the material chosen but because of poor ground preparation. Skipping the weed barrier or failing to compact the base leads to shifting, sinking, and weeds pushing through within a season. Get the foundation right, and your path will hold up for years without demanding much from you.
What a Cheap Garden Path Actually Costs
Before you head to the hardware store, it helps to know what you’re walking into. A DIY garden path costs between $2 and $10 per square foot on average, depending on complexity and materials chosen. Hiring a professional to do the same job can push that to anywhere from $9 to $35 per square foot.
Basic 12-by-12-inch concrete pavers run about $2 each, and combined with paver sand at roughly $6 per half-cubic-foot bag, you’re looking at around $8 per square foot for a solid paver path. Gravel paths are even cheaper. A half-cubic-foot bag of pea gravel covers up to 2.75 square feet for about $5.50, and when you add a sand base, total material costs come to roughly $4 per square foot.
Measure your path length and width before buying anything. A 3-foot-wide path that runs 20 feet is 60 square feet. At $4 per square foot for gravel, that’s $240 in materials, not counting edging. Knowing your square footage upfront stops you from over-buying or making two trips. If you’re working on a broader home project, this guide on going green at home without spending a fortune covers more ways to cut costs without cutting corners.
Cheap DIY Garden Path Ideas Worth Trying
Pea Gravel with Stepping Stones
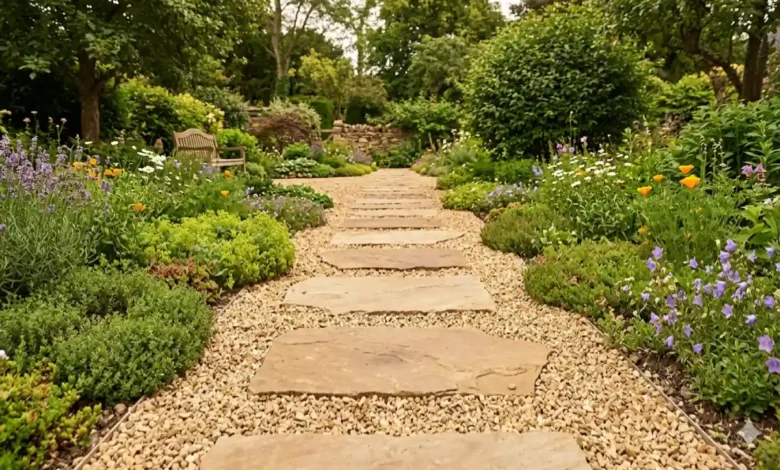
This combination is the most popular for a reason. The gravel-and-stepping-stone path requires minimal tools, makes a good beginner project, and suits almost any garden style. You set large flat stones at a comfortable stride distance apart, then fill the surrounding ground with pea gravel.
Space your stones to match your natural walking stride so you never step on the gravel. The stones take the wear; the gravel fills the visual gaps and handles drainage. Stepping stones cost around $8 each and pea gravel runs about $5 per bag, making this one of the most cost-effective combinations available.
Wood Chip and Mulch Paths
Mulch and gravel are the cheapest pathway materials available. For a mulch path, all you need to do is remove the sod, roll out landscape fabric, and spread the material. Wood chips, bark mulch, and even pine needles all work well.
Master gardener Louise Senior recommends cardboard layered under wood chips or pine needles for paths, which adds a free weed barrier before you lay your material. Keep the edges contained with steel, plastic, or timber edging so the chips don’t creep into your garden beds. If you want to add structure along the borders, a low-maintenance evergreen such as the Eagleston holly tree works particularly well as a natural edge plant alongside mulch paths.
The trade-off is longevity. Mulch paths need replacing every five to six years as organic material breaks down. That said, wood chips often cost little to nothing if you contact a local tree service. Many will drop a load at your property for free just to avoid disposal fees.
Recycled Brick Paths
Old bricks give a path texture and character that new materials rarely match. You can source reclaimed bricks from demolition yards, online auction sites, or even neighbors who want rid of old garden walls, often for free or far below retail cost. Clean off any old mortar with a hammer and chisel before laying it.
Lay bricks on a 2-inch compacted sand base in a running bond or herringbone pattern. Both patterns lock the bricks against lateral movement. Without that sand base, bricks shift and tilt after the first heavy rain.
Concrete Pavers on a Budget
Plain concrete pavers are the most straightforward option if you want a solid, permanent surface. They come in neutral grey, earthy tones, and basic shapes that look far better than they sound. Lay them as a continuous path or space them out as stepping stones to reduce material costs.
Crushed granite compacts well and gives a firm surface, making it a good filler material between spaced pavers. If you use pavers as stepping stones rather than a full surface, you cut material costs by 40 to 60 percent compared to a solid paved path. A garden path also falls squarely into the category of functional features that look amazing, where form and purpose meet without a large budget attached.
Log Rounds and Timber Slices
Cutting a log into thick rounds and setting them into the ground creates an organic, rustic path that costs almost nothing if you have access to fallen timber. You need rounds at least 3 to 4 inches thick to handle foot traffic without cracking. Set each round into excavated soil so the surface sits flush with ground level, then pack sand or fine gravel around the edges.
Wood is comfortable underfoot compared to gravel or brick, but it deteriorates over time and may need replacing every 10 to 15 years, depending on weather and maintenance. Treating each round with a wood preservative before installation extends its lifespan considerably.
How to Build a Cheap Garden Path
The process is roughly the same regardless of material.
- Mark your path with string, garden hose, or spray paint.
- Remove sod and dig down 3 to 4 inches along the entire path.
- Lay landscape fabric over the exposed soil, overlapping any joins by at least 6 inches.
- Add a 2-inch base layer of coarse sand or crushed gravel and compact it firmly.
- Set your primary material, whether stepping stones, bricks, or pavers, into the base layer.
- Fill gaps with gravel, wood chips, or sand, depending on the path type.
- Install edging to contain loose materials and define the path boundary.
Set edging so it sits about an inch above the fill material. Use a spacer stick cut to your intended path width as a guide when positioning the borders. This one detail keeps the path looking defined for years rather than just a few seasons.
Free and Recycled Materials That Deliver
If your budget is close to zero, that’s not a barrier. Free materials cut pathway installation costs significantly. If you find someone offering pavers or rock slabs online, you can turn their unwanted material into an almost-free DIY garden path. With free materials, sand for the base may be your only real cost.
Beyond pavers, broken concrete (sometimes called “urbanite”) works extremely well as a free flagstone substitute. Check online marketplaces, construction sites, or demolition jobs where contractors often pay to dispose of broken slabs. You simply chip the pieces to the size you want and set them as you would natural flagstone.
Broken tiles and crockery from kitchen or bathroom renovations also work well for mosaic-style paths, especially for short decorative sections. Glass bottles set vertically into mortar create an unusual path with a striking visual effect when light hits them, and they cost nothing if you collect them over time.
Mistakes That Cost You More Down the Line
Skipping the weed fabric is the most common error. Without it, weeds push through gravel and mulch within months. The fabric costs a few dollars per square foot and saves hours of weeding annually.
Laying material directly on unstable soil without compacting a base layer leads to an uneven path after the first freeze-thaw cycle or heavy rain. A 2-inch compacted sand base prevents this.
Avoid mulch or wood chip paths in areas with poor drainage or consistently wet soil. In those conditions, the material becomes soggy and breaks down rapidly. For wet zones, gravel with a compacted base handles drainage far better.
Buying too many bags of material without measuring is an easy way to double your budget. Measure twice, calculate your square footage, and confirm the quantity with your supplier before purchasing.
FAQs
How long does a DIY garden path take to build?
Most paths take one to two days. Gravel and mulch paths are the quickest. Brick and paver paths take longer because each piece needs individual leveling.
What is the cheapest material for a garden path?
Mulch is slightly cheaper than gravel and stone. Wood chips sourced from tree services cost almost nothing except your time. Recycled bricks and free pavers found online can bring material costs to near zero.
Do I need edging for a gravel path?
Yes. Without edging, gravel migrates into lawn and garden beds within a season. Steel landscape edging holds up the best over time. Timber and plastic edging work but need replacing sooner.
How do I stop weeds from growing through my path?
Lay landscape fabric before adding your path material. For extra weed suppression, overlap the seams by 6 inches and pin the fabric flat before spreading gravel or mulch on top.
Can I build a path on a slope?
Yes. Use larger flat stones set firmly into a compacted base, and increase the depth of sand between each stone to compensate for the incline. Gravel paths on steep slopes need edging on the downhill side to stop material washing away in rain.