
Wainscoting Panels: 6 Types, Costs & Installation Guide
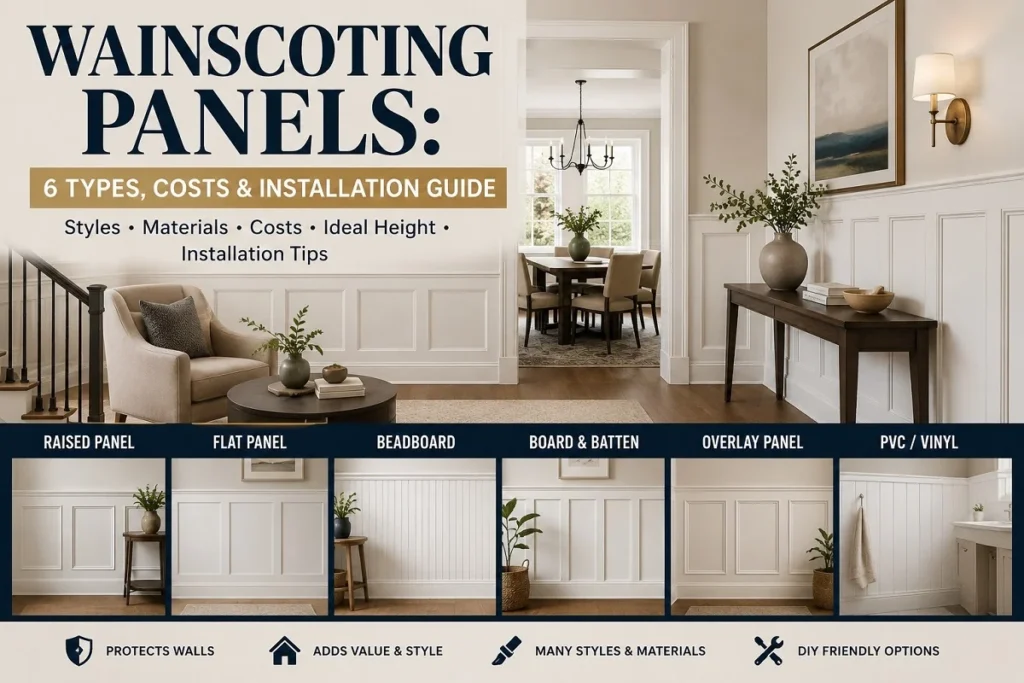
Wainscoting panels add architectural detail to the lower part of a wall while helping protect it from everyday scuffs and dents. The right design depends on your room, budget, wall proportions, and whether you plan to install it yourself or hire a professional.
A simple project can use painted trim or sheet material, while traditional designs may involve detailed woodwork. Before buying anything, it helps to understand the main styles, suitable materials, expected costs, and how the finished height will affect the room.
🏠 Wainscoting at a Glance
Common styles: Raised, flat, beadboard, board and batten, overlay, and PVC/vinyl
Height starting point: Around one-third of the wall
Material cost: Roughly $5–$40 per sq. ft.
Typical professional project: Around $1,050–$2,400
Good DIY options: Simple flat-panel and board-and-batten designs
For humid rooms: Choose a moisture-resistant material
Table of Contents
- What Are Wainscoting Panels?
- 6 Types of Wainscoting Panels
- How to Choose the Right Style for Your Room
- Wainscoting Materials: Wood, MDF, Plywood or PVC?
- How Much Does Wainscoting Cost?
- How High Should Wainscoting Be?
- How to Install Wainscoting Panels
- DIY or Professional Installation?
- Common Wainscoting Mistakes to Avoid
- Is Wainscoting Still in Style?
- Wainscoting vs. Beadboard: What’s the Difference?
- Does Wainscoting Increase Home Value?
- How Much Material Do You Need?
- Final Thoughts
What Are Wainscoting Panels?
Wainscoting is decorative paneling installed over the lower portion of an interior wall. Earlier homes used it partly to protect walls and improve comfort, but today it is mainly used for appearance and protection against marks, scratches, and minor damage.
It can work in dining rooms, hallways, entryways, bedrooms, bathrooms, stairways, and other areas where a plain wall needs more definition. The term describes the overall wall treatment rather than one particular pattern or material.
6 Types of Wainscoting Panels
Some designs are formal and detailed, while others use simple straight lines. Understanding these differences makes it easier to choose a style that fits the architecture of the room rather than following a trend that may look out of place.
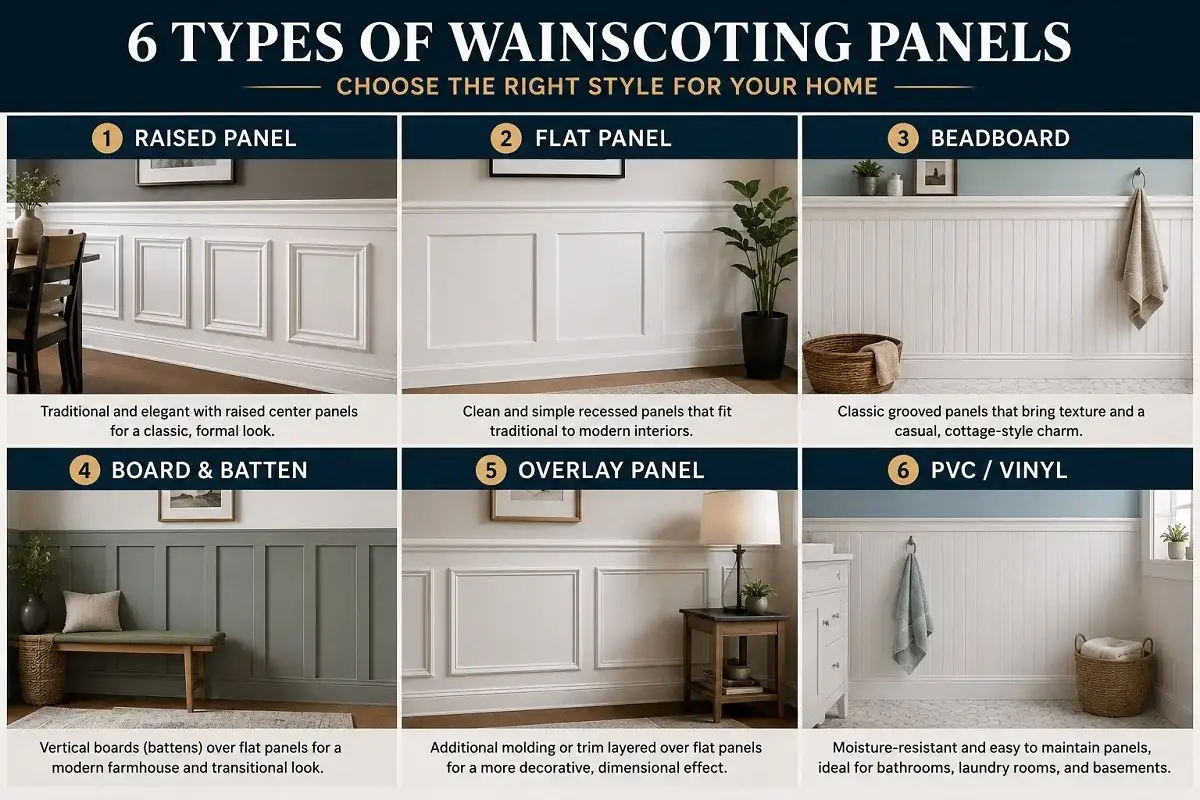
1. Raised Panel
Raised panels have a center section that projects slightly from the surrounding frame. This traditional design works particularly well in dining rooms, libraries, entryways, and homes with existing decorative trim.
The extra molding and joinery make it one of the more detailed options to build and install.
2. Flat Panel
Flat panels use smooth sections surrounded by rails and stiles. The simpler profile makes the design flexible enough for traditional, transitional, and more modern interiors.
It can be painted in the same color as the upper wall for a quiet look or given a contrasting finish for stronger definition.
3. Beadboard
Beadboard is recognized by its repeating narrow vertical grooves. It has a more casual character and is often associated with cottage, coastal, farmhouse, and traditional interiors.
It is sold as individual boards or larger sheets, which can make it practical for covering wider sections of wall.
4. Board and Batten
This design uses vertical battens to divide the wall into larger sections. Its clean geometry works well in bedrooms, hallways, living rooms, and contemporary or farmhouse-inspired spaces.
A basic version can often be created by fixing trim over an existing smooth wall, making it approachable for homeowners with basic carpentry experience.
5. Overlay Panel
Overlay designs add another layer of molding or panel detail over a flat surface. The added depth creates a more decorative finish without relying on a traditional milled raised panel.
It is best suited to spaces where detailed trim already feels appropriate, such as formal dining rooms or traditional living areas.
6. PVC or Vinyl Panels
Synthetic panels offer an alternative to wood-based products where water resistance and easy cleaning are priorities. They are commonly considered for laundry rooms, bathrooms, basements, and other areas exposed to higher humidity.
| Style | Best Fit | Overall Look | Installation |
|---|---|---|---|
| Raised panel | Formal rooms | Traditional | More difficult |
| Flat panel | Living areas and bedrooms | Clean | Moderate |
| Beadboard | Casual interiors | Cottage / coastal | Easier |
| Board and batten | Bedrooms and hallways | Modern / farmhouse | Moderate |
| Overlay | Traditional interiors | Decorative | More difficult |
| PVC / vinyl | Humid areas | Varies by product | Varies |
How to Choose the Right Style for Your Room
Start with the room rather than the panel design. Existing doors, window trim, baseboards, ceiling height, furniture, and architectural style should all influence your choice.
A room with traditional molding can support more detailed panels. A modern space may look better with wider sections and fewer decorative elements. In busy areas, also consider how easily the finished surface can be cleaned or touched up.
✓ A Simple Way to Choose
Want a formal look? Consider raised or overlay panels.
Prefer clean lines? Flat panel or board and batten may fit better.
Working with a casual interior? A grooved panel design can add texture without looking formal.
Installing in a humid space? Choose the material for moisture resistance first, then choose the style.
Wainscoting Materials: Wood, MDF, Plywood or PVC?
The design and material are two separate choices. The same general look can often be created with different products, so consider how the room is used before focusing only on appearance.
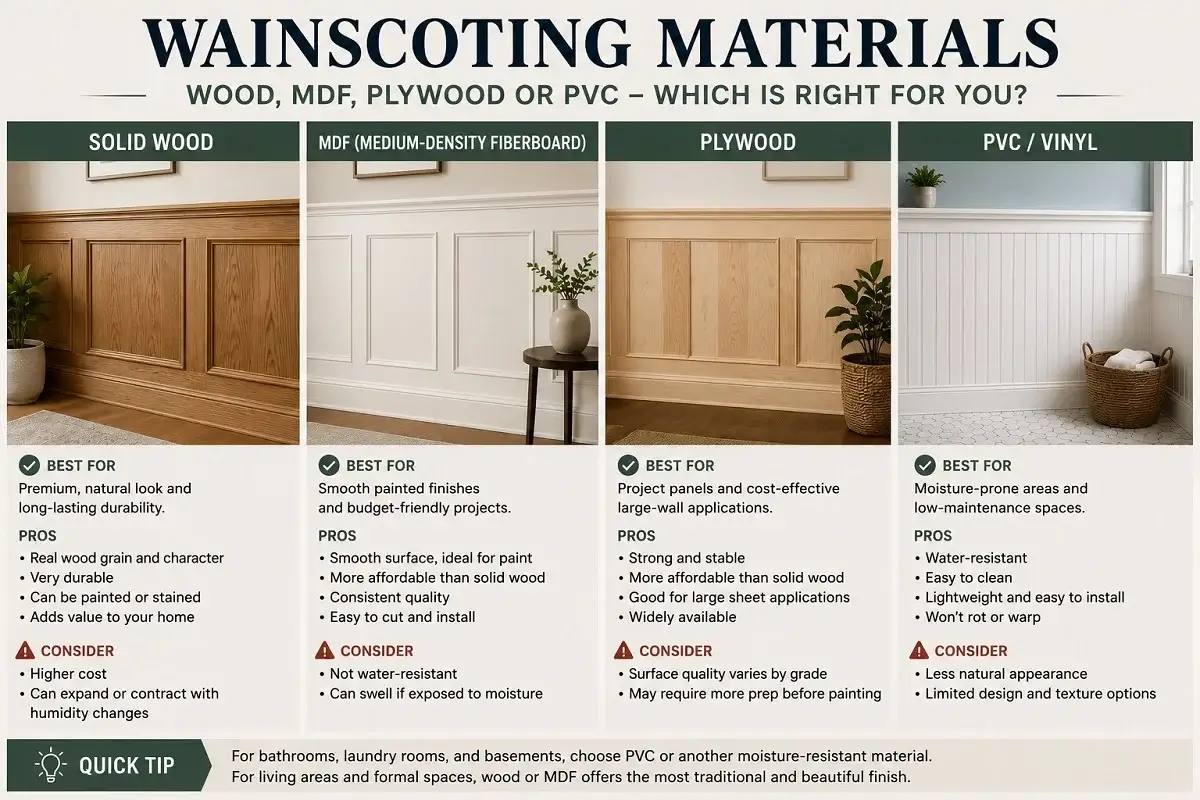
Solid Wood
Solid wood provides natural grain and can be stained instead of painted. Hardwoods can create a high-end finish, but they usually cost more and require careful cutting and finishing.
MDF
MDF has a smooth surface that takes paint well and is often more affordable than hardwood. Its main limitation is water exposure because standard products can swell after absorbing moisture.
Plywood
Plywood can be useful for sheet-based installations and budget-conscious projects. Check the face quality before buying because lower grades may require more preparation before painting.
PVC and Vinyl
These materials are easy to clean and resist water better than standard wood-based boards. That makes them useful where humidity or occasional splashes are expected.
| Material | Main Strength | Watch For |
|---|---|---|
| Solid wood | Natural grain and premium finish | Higher price |
| MDF | Smooth and paintable | Water exposure |
| Plywood | Useful sheet material | Variable surface quality |
| PVC / vinyl | Water resistance | Less natural appearance |
How Much Does Wainscoting Cost?
Price varies widely because a basic painted wall treatment and a custom hardwood installation require very different amounts of material and labor. Current cost guides put common materials at roughly $5 to $40 per square foot, depending on what you choose.
A professionally completed project often falls around $1,050 to $2,400, with an average near $1,325. Larger rooms, hardwood, detailed molding, difficult corners, and extra preparation can push the total higher.
Labor may also be quoted by the hour. Rates vary by location and contractor, so compare the scope of each estimate rather than looking only at the headline price.
💡 Before Comparing Quotes
Check whether the price includes wall preparation, removal or adjustment of existing trim, materials, installation, filling, caulk, primer, paint, and cleanup. A low quote may cover fewer parts of the job.
How High Should Wainscoting Be?
About one-third of the wall height is a useful starting point for a traditional installation. It is not a fixed design rule. Windows, furniture, existing trim, and the proportions of the room may make a slightly lower or taller treatment look better.
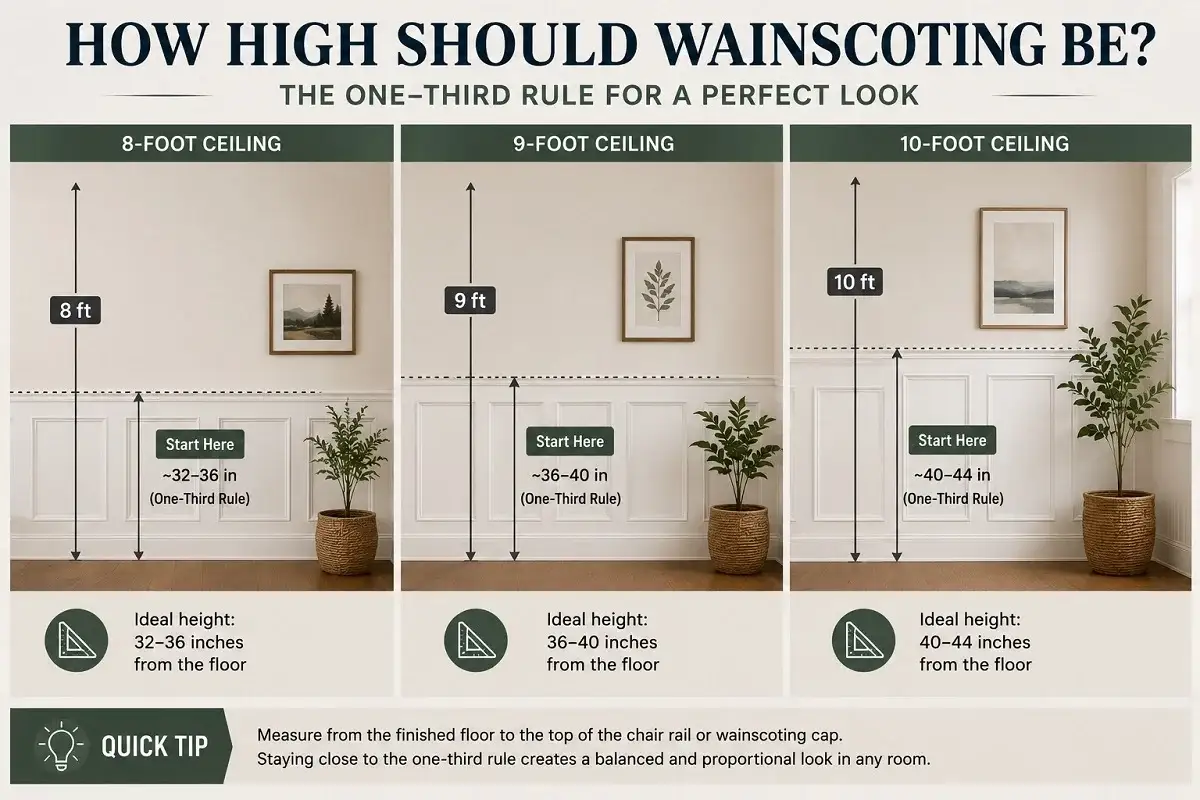
| Ceiling Height | One-Third Starting Point |
|---|---|
| 8 ft | About 32 in |
| 9 ft | About 36 in |
| 10 ft | About 40 in |
| 11 ft | About 44 in |
There is an easy way to test the height before making a cut. Mark the proposed top edge with painter’s tape, then view the room from the doorway and from where you normally sit or stand. Adjust the line until it works with the surrounding features.
How to Install Wainscoting Panels
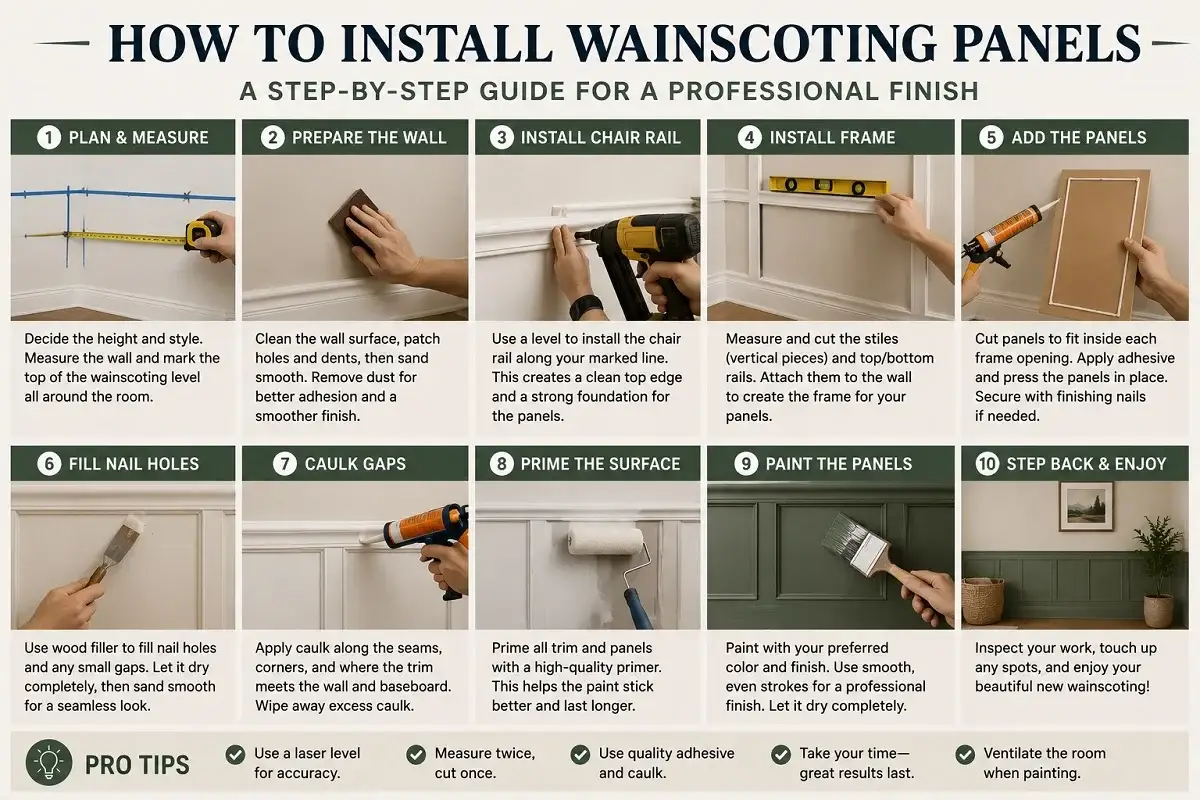
Different systems require different construction methods, but most successful installations begin with careful layout. Planning first helps avoid narrow leftover sections, awkward corners, and trim that clashes with outlets or door casings.
1. Measure Every Wall
Record the length of each wall separately and decide the finished height. Mark doors, windows, electrical fittings, radiators, and other obstacles on a simple sketch.
2. Plan the Layout Before Cutting
Work out the position of rails, stiles, or panel joints across the full wall. Aim for balanced spacing, especially around doors and highly visible corners.
3. Check the Existing Surface
Use a level to identify floors or walls that are not straight. Repair loose material and large damaged areas before covering the surface.
4. Mark Studs and Reference Lines
Locate suitable fixing points and mark a level line for the top of the installation. A reliable reference line is more useful than following an uneven floor.
5. Cut and Fit the Main Pieces
Dry-fit important sections before attaching them. Depending on the system and wall construction, installation may involve adhesive, finishing nails, or mechanical fasteners into suitable backing.
6. Deal With Corners and Electrical Fittings
Measure these cuts carefully because small errors are more visible around switches, sockets, and door trim. Turn off the electrical supply before working around outlet boxes or removing covers.
7. Install the Top Trim
Add the chair rail or cap and check it against your reference line as you work around the room. Clean joints at corners make a noticeable difference to the finished result.
8. Finish the Surface
Fill nail holes, caulk small gaps, sand rough areas, and apply the appropriate primer and paint. Do not rush this stage; clean finishing can make a relatively simple design look much more professional.
DIY or Professional Installation?
A straightforward project can be manageable for someone who is comfortable measuring, using a level, cutting trim, and making accurate joints. Complexity rises quickly when a room has uneven surfaces, stairs, numerous corners, difficult existing trim, or expensive material.
🔨 DIY or Hire a Pro?
DIY may make sense: Simple layout, paint-grade material, straight walls, basic tools, and a single room.
Professional help may be worth it: Custom woodwork, stained finishes, stairs, complex corners, uneven surfaces, or several connected rooms.
Common Wainscoting Mistakes to Avoid
Choosing a Height Before Checking the Room
A standard measurement can look wrong when it cuts awkwardly across windows, switches, furniture, or other trim. Test the line visually first.
Starting Installation Without a Full Layout
Planning one panel at a time can leave a narrow or uneven section at the end of the wall. Work out the complete spacing before making permanent cuts.
Assuming the Floor Is Level
Older floors often slope slightly. Use a level reference line so the top of the finished work remains visually straight.
Choosing Material Only by Price
The cheapest option may not suit the conditions of the room. Consider water exposure, wear, desired finish, and how easily damaged sections can be repaired.
Rushing Caulk and Paint
Nail holes, open seams, rough joints, and paint buildup can draw attention to small installation errors. Leave enough time for the final surface preparation.
Is Wainscoting Still in Style?
Yes, but it is no longer limited to white raised panels in traditional dining rooms. Current interiors also use cleaner flat designs, wider spacing, natural wood finishes, deeper paint colors, and taller treatments.
Longevity comes from matching the design to the home rather than copying a temporary look. Simple proportions are usually easier to adapt when furniture, paint colors, or decor change later.
Wainscoting vs. Beadboard: What’s the Difference?
These terms are related but not interchangeable. Wainscoting describes the treatment of the lower wall, while beadboard describes a particular grooved panel design. That grooved material can be used to create the lower-wall treatment, but it is only one of several available styles.
Does Wainscoting Increase Home Value?
There is no guaranteed dollar increase simply from adding decorative paneling. Its value is more practical: a well-designed installation can protect busy walls and give a room a more finished appearance.
For resale, quality matters more than complexity. A design that suits the architecture and has clean joints, balanced proportions, and a durable finish is more likely to appeal to buyers than an elaborate treatment that feels out of place.
How Much Material Do You Need?
Measure the combined length of the walls being covered and multiply it by the planned height to estimate the basic panel area. Subtract large openings where no material will be installed, then allow extra for cuts and waste.
📐 Quick Example
A project covering 40 linear feet of wall at a height of 3 feet has a basic area of 120 square feet. Add a waste allowance before ordering, especially when the layout requires many cuts.
Final Thoughts
The best wainscoting project is not necessarily the most detailed or expensive one. Choose a design that fits the room, a material suited to the conditions, and a height that works with the wall proportions.
Most installation problems can be prevented before the first permanent cut. Measure carefully, plan the complete layout, test the height, and leave enough time for the finishing work that makes the final result look intentional.