Installing Drainage Pipes Under Your Driveway: A How-To Guide

Is your driveway constantly flooding during heavy rains, causing damage and creating hazardous conditions? It’s time to take control of your property’s drainage with this comprehensive guide on installing drainage pipes under your driveway.
Installing drainage pipes under your driveway is a crucial step in protecting your property from water damage and ensuring the longevity of your driveway. This article will provide you with a step-by-step guide on how to properly plan, design, and install a drainage system that will keep your driveway in top condition for years to come.
Introduction
A well-maintained driveway is essential for both the aesthetic appeal and functionality of your property. However, without proper drainage, your driveway can quickly deteriorate due to water damage, leading to cracks, potholes, and even foundation issues. Installing drainage pipes under your driveway is an effective solution to prevent these problems and protect your investment. By directing water away from your driveway and into a designated drainage system, you can minimize the risk of water damage and extend the life of your driveway.
Understanding the Basics of Drainage Pipes
Before diving into the installation process, it’s essential to understand the different types of drainage pipes available and their purposes. The most common types of drainage pipes used for driveway applications are corrugated plastic pipes and PVC pipes. Corrugated plastic pipes are flexible, lightweight, and easy to install, making them a popular choice for DIY projects. On the other hand, PVC pipes are more rigid and durable, offering a long-lasting solution for your drainage needs. Both types of pipes work by collecting water from the surface of your driveway and directing it away from your property, preventing water from seeping into the soil and causing damage to your driveway’s foundation.
Pre-Installation Planning
Before beginning the installation process, it’s crucial to assess your driveway’s drainage needs and gather the necessary tools and materials. Start by observing your driveway during a heavy rainstorm to identify areas where water tends to pool or flow. This will help you determine the best location for your drainage pipes and the extent of the drainage system required. Next, make a list of the tools and materials you’ll need for the job, including shovels, pickaxes, measuring tape, level, drainage pipes, gravel, and backfill material. Don’t forget to check with your local authorities to obtain any necessary permits and understand the regulations surrounding drainage installations in your area.
Designing Your Drainage System
With your pre-installation planning complete, it’s time to design your drainage system. Begin by sketching out the layout of your drainage pipes, taking into account the slope of your driveway and the location of your drainage outlet. A proper slope is essential for ensuring that water flows efficiently through the pipes and away from your property. As a general rule, aim for a slope of at least 1/4 inch per foot of pipe length. When determining the depth of your drainage pipes, consider factors such as the climate in your area, the type of soil, and the amount of traffic your driveway receives. The following table provides a comparison of pipe materials and sizes to help you choose the best option for your project:
| Pipe Material | Diameter | Pros | Cons |
|---|---|---|---|
| Corrugated Plastic | 4″ – 12″ | Flexible, lightweight, easy to install | Less durable than PVC |
| PVC | 4″ – 12″ | Rigid, durable, long-lasting | More expensive, requires precise cuts |
Preparing the Site
With your drainage system designed, it’s time to prepare the site for installation. Begin by marking the area where you’ll be installing the drainage pipes using spray paint or stakes and string. Next, use a shovel or pickaxe to excavate the marked area, creating a trench that is deep enough to accommodate your drainage pipes and any necessary gravel or backfill material. When excavating, be sure to work carefully to minimize damage to your driveway and surrounding landscape. If you encounter any large rocks or tree roots, use a pickaxe to remove them and create a smooth, even surface for your pipes.
Installing the Drainage Pipes
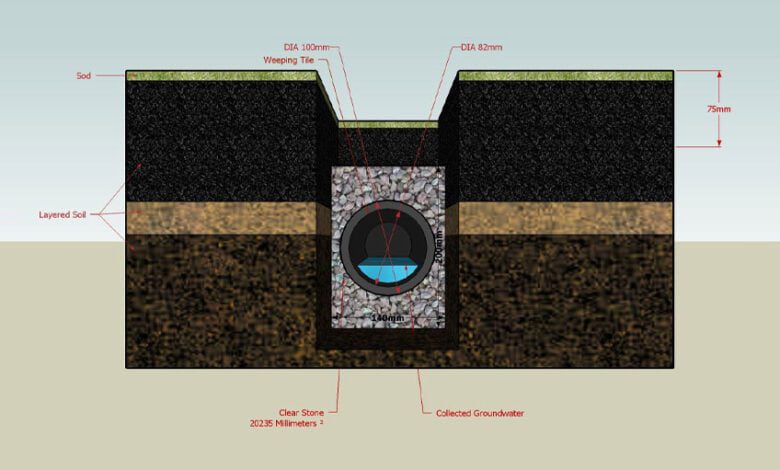
With your site prepared, it’s time to install the drainage pipes. Begin by laying a layer of gravel at the bottom of the trench to create a stable base for your pipes. Next, place your drainage pipes in the trench, making sure to maintain the proper slope and alignment for efficient water flow. If you’re using corrugated plastic pipes, use a hacksaw or pipe cutter to cut the pipes to the desired length. For PVC pipes, use a PVC cutter or handsaw to make precise cuts. When connecting pipes, use couplings or fittings to create a secure, leak-free connection. As you lay the pipes, use a level to ensure that they maintain the proper slope and alignment.
Backfilling and Compacting
Once your drainage pipes are in place, it’s time to backfill the trench and compact the soil to prevent settling. Begin by selecting a suitable backfill material, such as sand or gravel, that will allow water to flow freely through the soil while providing stability for your pipes. As you backfill the trench, use a tamper or plate compactor to compact the soil in layers, ensuring that there are no air pockets or voids that could lead to settling. Be sure to backfill and compact the soil evenly on all sides of the pipes to prevent any shifting or damage.
Finishing Touches
With your drainage pipes installed and the trench backfilled, it’s time to focus on the finishing touches. If your driveway surface was damaged during the installation process, use an asphalt patch or concrete mix to repair any cracks or holes. When landscaping around your drainage system, consider using permeable pavers or gravel to allow water to infiltrate the soil and prevent pooling. You may also want to install catch basins or grates at the end of your drainage pipes to collect debris and prevent clogs.
Maintenance Tips
To ensure that your drainage system continues to function properly, it’s important to perform regular maintenance. Schedule annual inspections of your drainage pipes to check for any signs of damage, clogs, or settling. If you notice any issues, address them promptly to prevent further damage. To keep your pipes clear of debris, consider installing screen covers or grates at the inlet and outlet points. Additionally, make sure to keep the area around your drainage system free of leaves, grass clippings, and other debris that could clog the pipes.
Troubleshooting Common Issues
Even with proper installation and maintenance, issues can arise with your driveway drainage system. Some common problems include standing water, slow drainage, and pipe damage. If you notice any of these issues, start by inspecting your pipes for clogs or damage. If the problem persists, it may be necessary to call in a professional for a more thorough assessment and repair.
The Environmental Impact of Your Drainage System
When installing a drainage system, it’s important to consider the environmental impact of your choices. To ensure that your system is eco-friendly, consider using permeable materials like gravel or pavers that allow water to infiltrate the soil and recharge groundwater supplies. Additionally, make sure that your drainage system is not directing water onto neighboring properties or into storm drains, as this can contribute to erosion and water pollution. By following sustainable practices in your drainage installation, you can protect both your property and the environment.
Cost Considerations
The cost of installing drainage pipes under your driveway can vary depending on factors such as the size of your driveway, the type of pipes used, and the complexity of the installation. On average, homeowners can expect to pay between $1,000 and $5,000 for a complete driveway drainage system. The following table provides a breakdown of the typical costs associated with drainage pipe installation:
| Item | Cost Range |
|---|---|
| Materials (pipes, gravel, etc.) | $200 – $1,000 |
| Equipment rental | $100 – $500 |
| Labor (if hiring a professional) | $500 – $3,000 |
| Permits and fees | $50 – $500 |
Legal and Compliance Issues
Before beginning your drainage installation project, it’s crucial to understand the legal requirements and compliance issues in your area. Start by checking with your local building department to determine if any permits are required for the work. You may also need to submit plans for approval before beginning construction. If you live in a community with a homeowners association (HOA), make sure to review their rules and regulations regarding driveway modifications and drainage installations. Failure to comply with legal requirements and HOA rules could result in fines or legal action, so it’s essential to do your due diligence before starting your project.
Hiring Professionals vs. DIY
When it comes to installing drainage pipes under your driveway, you have the option of tackling the project yourself or hiring professionals to handle the work. If you have experience with excavation and pipe installation, a DIY approach can save you money on labor costs. However, if you’re unsure of your abilities or lack the necessary tools and equipment, hiring professionals may be the better choice. When selecting a contractor for your project, look for companies with experience in driveway drainage installations and positive reviews from previous clients. Be sure to obtain several quotes and compare pricing and services before making a final decision.
Conclusion
Installing drainage pipes under your driveway is a smart investment in the longevity and functionality of your property. By following the steps outlined in this guide, you can design and install an effective drainage system that will protect your driveway from water damage and ensure proper water flow away from your home. Remember to assess your drainage needs, obtain necessary permits, and follow proper installation techniques to achieve the best results. With regular maintenance and attention to detail, your driveway drainage system will provide reliable performance for years to come.
FAQs
How deep should I bury my drainage pipes?
The depth of your drainage pipes will depend on factors such as climate, soil type, and traffic load. In general, aim for a minimum depth of 12-18 inches below the surface of your driveway.
Can I use corrugated plastic pipes for my driveway drainage system?
Yes, corrugated plastic pipes are a popular choice for driveway drainage installations due to their flexibility, lightweight design, and ease of installation.
How often should I inspect my driveway drainage system?
It’s a good idea to inspect your driveway drainage system at least once a year to check for any signs of damage, clogs, or settling. Address any issues promptly to prevent further damage.
Do I need to obtain permits for my driveway drainage installation?
Permit requirements vary by location, so it’s essential to check with your local building department before beginning your project. In some cases, you may need to submit plans for approval and obtain permits before starting work.
Can I install a driveway drainage system myself, or do I need to hire professionals?
If you have experience with excavation and pipe installation, a DIY approach can save you money on labor costs. However, if you’re unsure of your abilities or lack the necessary tools and equipment, hiring professionals may be the better choice to ensure proper installation and avoid costly mistakes.


