How To Clean A Shower Head: The Complete Step-by-Step Guide
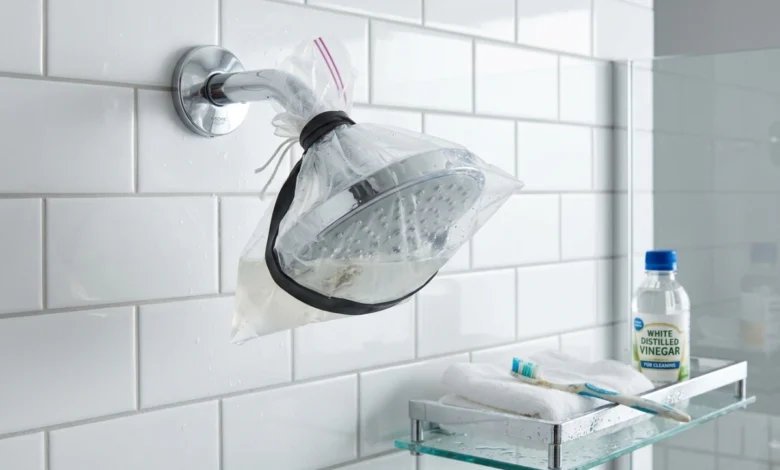
To clean a shower head, fill a plastic bag with white vinegar and secure it over the head for 30 minutes to overnight. For brass or gold finishes, limit soaking to 30 minutes. Remove the bag, scrub the nozzles with an old toothbrush, then run hot water for two minutes to flush out loose deposits. Repeat monthly for best results.
Why a Dirty Shower Head Is a Real Problem
You might think a little mineral crust on your shower head is just an eyesore. It is actually more than that.
Hard water deposits, called limescale, build up inside the nozzle holes over time. They narrow the channels, block individual jets, and send water spraying at odd angles. Your water pressure drops. Your shower becomes less effective.
There is also a hygiene concern worth knowing. Research published in Proceedings of the National Academy of Sciences found that signs of Mycobacterium avium, a bacterium linked to lung infections, were identified in 20% of showerhead swabs sampled across the United States. A separate analysis of 656 households confirmed that mycobacteria were more than two times more abundant in U.S. homes receiving municipal water than in homes on well water.
The CDC also notes that germs growing in the biofilm inside a showerhead can be released into the spray, and this is more likely to happen if the fixture has not been used for a week or longer.
Most healthy people face no real risk from this. But regular cleaning matters, especially if anyone in your home has a respiratory condition or a weakened immune system.
What Causes Shower Head Buildup
Two things cause most of the gunk you see on a shower head: mineral deposits and biofilm.
Mineral deposits (limescale) come from hard water. When water evaporates, calcium and magnesium stay behind on surfaces. Over time, these minerals form limescale that narrows channels, blocks holes, and changes spray direction. If you see chalky white or greenish crust around the face of your shower head, that is limescale.
Biofilm is a thin, slimy layer of microorganisms. Warmth and humidity help a thin biofilm develop inside your shower head, and routine cleaning removes food sources and breaks up that film. Brown or slimy residue, or a musty smell from your shower, usually points to biofilm.
If you live in an area with hard water, both problems will appear faster. Check your local utility’s annual water quality report to see your calcium and magnesium levels. A reading above 7 grains per gallon (gpg) means you should clean your shower head at least once a month.
What You Need Before You Start
You do not need any special products. Most of what you need is already in your kitchen.
For a basic cleaning:
- White distilled vinegar (5% acidity)
- A zip-top plastic bag
- Rubber bands or twist ties
- An old toothbrush
- A clean cloth or microfiber towel
For a deep clean (removed shower head):
- The items above
- An adjustable wrench or pliers
- Plumber’s tape (also called PTFE tape)
- A bowl large enough to submerge the shower head
Optional:
- Baking soda (adds gentle abrasion)
- Lemon juice (fresh scent, mild acid boost)
- Commercial limescale remover (for heavy buildup)
A quick note on vinegar: white distilled vinegar is the most effective choice. Malt vinegar is less potent, and brown vinegar may stain surfaces, so always stick with white.
How To Clean A Shower Head Without Removing It
This is the easiest method and works well for regular monthly maintenance.
Step 1: Fill the bag. Pour white vinegar into a plastic zip-top bag until it is about half full. You need enough to fully cover the shower head nozzles once the bag is attached.
Step 2: Attach the bag. Pull the open bag up over the shower head so all the spray holes are submerged in the vinegar. Use rubber bands or twist ties to hold the bag firmly to the shower arm. Check that nothing is leaking.
Step 3: Soak. Let the shower head soak for at least 30 minutes. For heavy buildup, overnight is better. If your fixture has a brass, gold, nickel, or oil-rubbed bronze finish, remove the shower head from the solution after 30 minutes to avoid damage to the finish.
Step 4: Scrub. Remove the bag and use an old toothbrush to scrub the nozzle holes. Work in small circles and focus on any visible crust. For stubborn spots, dip the brush in vinegar or sprinkle a little baking soda on the bristles before scrubbing.
Step 5: Flush. Turn on the hot water and let it run for two full minutes. This clears any dislodged deposits still sitting inside the head.
Step 6: Wipe and dry. Use a clean cloth to wipe the face of the shower head. Drying the surface after each shower also slows future mineral buildup.
How To Deep Clean a Removable Shower Head
If your shower head has not been cleaned in a long time, or if the bag method has not fully restored water pressure, a full soak works better.
Step 1: Remove the shower head. Turn it counter-clockwise by hand. If it is tight, use pliers with a cloth wrapped around the fixture to protect the finish. Do not overtighten on reinstallation.
Step 2: Check the filter screen. Many shower heads have a small mesh filter screen at the connection point. Remove it with tweezers or a toothpick and rinse it under the tap. If it is clogged with debris, soak it in vinegar for 10 minutes, then rinse again.
Step 3: Soak in vinegar. Place the shower head in a bowl and pour in enough white vinegar to cover it completely. Leave the shower head in vinegar for a minimum of 3 to 4 hours, and preferably overnight for the best effect.
Step 4: Scrub and rinse. Remove the shower head, scrub all surfaces with a toothbrush, and rinse thoroughly under warm water.
Step 5: Clear blocked nozzles. If individual spray holes are still clogged, use a small needle or safety pin to clear each hole individually, then combine that with a vinegar soak for best results.
Step 6: Reinstall. Wrap the threads with a few layers of plumber’s tape before screwing the shower head back on. Hand-tighten first, then give it a half-turn with pliers. Turn on the water and check for leaks.
Cleaning Different Shower Head Finishes
Not every shower head can handle the same cleaning approach. The finish matters.
| Finish | Safe Cleaning Approach |
|---|---|
| Chrome or stainless steel | Full-strength vinegar, up to overnight |
| Brass or gold | Diluted vinegar (equal parts water and vinegar), max 30 minutes |
| Nickel or matte black | Diluted vinegar, short soak, rinse quickly |
| Oil-rubbed bronze | Mild soap and warm water; very brief diluted vinegar only |
| Plastic | Full-strength vinegar is safe; plastic harbours more bacteria than metal |
For delicate finishes like brass, nickel, matte black, or oil-rubbed bronze, use diluted vinegar and keep contact time short. For regular care, mild soap and warm water are safer. Always test a small, hidden area first.
One more thing worth noting: plastic shower heads tend to harbour more microbes than metal ones, partly because plastic provides a more porous surface where bacteria can attach and grow. If hygiene is a priority, a metal fixture is a better long-term choice.
How Often Should You Clean Your Shower Head
Clean and descale your shower head around once a month to remove limescale and bacteria. If left untreated, limescale can cause blockages and lower water pressure. You may want to clean more frequently if you live in an area with hard water.
Here is a simple schedule to follow:
- Every week: Wipe the face of the shower head with a damp cloth after use. Dry the surface to slow mineral deposits.
- Every month: Run the full vinegar bag soak for 30 to 60 minutes.
- Every 3 months: Do a deep clean with the shower head removed. Clean the filter screen at the same time.
- Every 6 to 12 months: If you have not used a guest shower in a while, flush the fixture before using it again by running water until it gets hot and runs clear.
When Vinegar Alone Is Not Enough
Vinegar handles most cases well. But there are times when you need something stronger.
Commercial limescale removers are available at most hardware and grocery stores. They are more acidic than vinegar and dissolve heavy deposits faster. Always wear gloves and do not spray anything overhead. Rinse the shower head thoroughly after use.
Citric acid is a gentler alternative to commercial cleaners. Mix two tablespoons of citric acid powder with one cup of warm water. Use this solution in place of vinegar in any of the methods above. It is especially useful for brass and plated finishes.
Baking soda paste helps with surface stains. Mix baking soda with just enough water to form a thick paste. Apply it to the face of the shower head, let it sit for five minutes, and scrub with a toothbrush. Baking soda is one of the most versatile cleaners in your home — if you are also dealing with stubborn marks on your floors, our guide on how to remove grease and oil stains from carpet uses the same principles to lift tough residue from fabric surfaces.
One safety note: never mix bleach with vinegar or with other acids, as this can create toxic gas. Rinse all parts thoroughly and run water for a few minutes after using any cleaner.
Signs It Is Time To Replace Your Shower Head
Sometimes, cleaning is not enough. Here are signs that a replacement makes more sense than another round of scrubbing:
- Water pressure stays low even after a deep clean and filter rinse
- Several nozzle holes are permanently blocked or cracked
- The fixture is more than 8 to 10 years old
- Visible corrosion on the connection point or arm
- You have been dealing with recurring clogs despite monthly cleaning
If your shower head has not been changed in years, replacing it can dramatically reduce bacterial buildup. New fixtures also tend to be more water-efficient, which saves money over time.
If you manage a rental property or multiple bathrooms, recurring fixture issues across several units are often better handled by a professional. Commercial janitorial services can carry out deep cleaning across all bathrooms on a regular schedule, which is far more practical than tackling each unit individually.
If you are replacing the shower head as part of a broader bathroom refresh, it pays to plan the order of your work carefully. Getting the sequence right matters more than most people expect — the same way it does when you are deciding whether to paint walls before staining stairs. Doing things in the wrong order can cost you extra time and effort to fix.
If water pressure is low even with a clean shower head, the issue may be with your home’s water supply pressure. A plumber can check this quickly.
FAQs
Can I use apple cider vinegar instead of white vinegar?
It is not recommended. White distilled vinegar at 5% acidity is the most effective choice for dissolving limescale. Apple cider vinegar is weaker and may leave a faint residue or discolouration on some finishes.
Is it safe to clean a shower head with bleach?
Bleach can disinfect a shower head, but it must never be mixed with vinegar or any acid-based cleaner. If you use bleach, dilute it (one tablespoon per gallon of water), soak briefly (no more than 10 minutes), and rinse very thoroughly. Bleach can also damage plated or colored finishes with extended contact.
My shower head still sprays unevenly after cleaning. What now?
First, try clearing individual nozzle holes with a pin or toothpick and follow with another vinegar soak. If the problem continues, remove the shower head and check the filter screen for blockages. If all else fails, the issue may be with your home’s water pressure rather than the fixture itself.
How do I stop limescale from building up so quickly?
Wipe and dry the shower head face after each use. You can also apply a thin layer of car wax to chrome or stainless steel finishes once a month; it creates a surface that mineral deposits find harder to stick to. In areas with very hard water, a shower filter or whole-home water softener will reduce mineral content at the source.
Does cleaning a shower head improve water pressure?
Yes, in most cases. Blocked nozzle holes and clogged filter screens are among the most common reasons for reduced shower pressure. A thorough vinegar soak and filter clean often restores full flow within an hour.